| Book |
Page |
Context |
 |
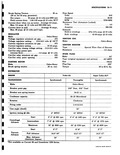 |
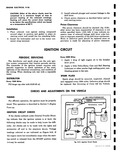
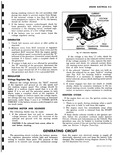
amps 14 volts and 2900 rpn Field current draw 1 50 1 62 amps 12 volts 80 I Current draw when run as motor Average 4 8 amps Max 5 5 amps 12 volts ...
Current draw at stall Average 70 amps Max 80 amps 12 volts and 0 rpm REGULATOR Make Delco Rem3 Voltage regulator armature air gap 07 Voltage regulator setting 13 8 14 8 volts ...
available on Corvair 95 and Greenbrier 1200 Seri Free Speed Volts 10 6 i Amperes 58 80 RPM 6750 8600 Resistance Test Armature Locked Volts 4 0 Amperes 280 320 Solenoid Hold in windings |
|
 |
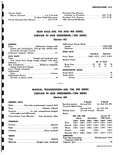
transmissions and rear axle are identical Therefore when this driveline is used the lubricant Multipurpose Lubricant SAE 80 cycles between the axle and transmission Although the lubricant is common individual filler plugs are provided ...
axle lubricant should be checked each 1000 miles and replenished as necessary with Multi purpose Lubricant SAE 80 Axle lubricant should be drained and replaced at the end of the first 1000 miles to eliminate ...
prevent axle lubricant from entering the transmission The automatic transmission rear axle uses Multipurpose Lubricant SAE 80 whereas the automatic transmission requires Automatic Transmission Fluid Type A common in most automatic transmissions Drive pinion design |
|
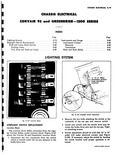 |
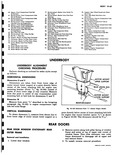
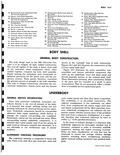
HTJ1T BLOW GL 80X ELECTRICAL EENBRIER 1Z00 SERIES IDEX Page Instruments and Gauge 8 80 Instrument Cluster 8 80 Removal 8 80 Installation 8 81 Horn and Horn Relay 8 81 G SYSTEM |
|
 |
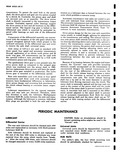
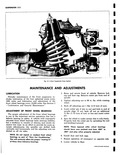
MAINTENANCE a LUBRICATION R Common lubricant SAE 80 Multipurpose Gear Lubricant is used in the four speed transmission and differential carrier so no oil seals are used between these units Actually there is some interchange ...
should any lubricant containing active sulphur be used i Also do not use mineral oil Only SAE 80 Multipurpose Gear Lubricant should 6e used SERVICE C SERVICE REF All service operations relative to the four ...
Reinstall the drain plugs and refill each unit to the level of the filler plugs with SAE 80 Multipurpose Gear Lubricant SHIFT LINKAGE ADJUSTMENT After any service operation in which the shift control |
|
 |
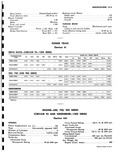
MAINTENANCE I LUBRICATION Common lubricant SAE 80 Multipurpose Gear Lubricant is used in the manual three speed transmission and differential carrier so no oil seals are used between these units Actually there is some interchange ...
circumstances should any lubricant containing active sulphur be used Also do not use mineral oil Only SAE 80 I Multipurpose gear lubricant should be used Oil Change At the end of the first 1000 miles ...
Reinstall the drain plugs and refill each unit to the level of the filler plugs with SAE 80 Multipurpose Gear Lubricant Complete refills require a total of 4 9 pints lubricant approximately 21 2 pints |
|
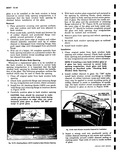 |
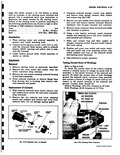
mouldings Tie back window reveal mouldings and rubber channel to glass as shown in Figure 10 80 RACK WINDOW UPPER CORDS SECURING REVEAL MOULDING 11 i L REVEAL MOULDINGS 3 RUBBER CHANNEL BACK WINDOW REVEAL ...
BACK WINDOW LOWER REVEAL MOULDING R 3 L BACK WINDOW REVEAL r MOULDING CENTER ESCUTCHEON Fig 10 80 Back Window Assembly Prepared for Installation 3 Insert a strong cord into pinchweld cavity of rubber channel |
|
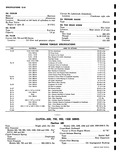 |
SPECIFICATIONS USED TO ATTACH TORQUE iment 40 b0in Ibs er 60 80in Ibs Cyl Head 60 80 in Ibs H 8 R H Attachment 60 80 in Ibs le 60 BOin Ibs Cover |
|
 |
TRANSMISSION AXLE ASSEMBLY STANDARD TRANSMISSION ASSEMBLIES Recommended Lubricants Since both units are connected by internal passages SAE 80 Multi Purpose gear lubricant must be used CAUTION Straight Mineral Oil gear lubricants or any lead soap ...
active sulphur lubricants must not be used G M No 3772661 SAE 80 is recommended for year around use Lubricant Additions The lubricant level in these units should be checked periodically every 1000 miles |
|
 |
pump year with engine oil before installation 4 Install pump cover and attaching bolts and torque 80 to 80 inch pounds S Insert a long screwdriver down the distributor mounting hole in the engine rear |
|
 |
rear engine mounting brackets are in place on mounts then install nuts Torque front mounts to 60 80 ft lbs and rear mount 50 60 ft lbs Install cotter pins at both mountings NOTE ...
back up light switch Fill transmission and differential carrier to level of filler plug holes with SAE 80 Multipurpose Gear Lubricant 5 Install axle shafts in differential carrier as described in Section |
|
 |
crankshaft pulley is in place Back bolt off 1 z turn and then tighten bolt 60 to 80 ft lbs torque 3 Install oil filter and torque bolt 9 to 15 ft lbs 4 Install ...
install retainer cotter pin 6 Tighten front engine mount nuts 60 to 80 ft lbs torque fig 6A 17 and install cotter pins On vehicles equipped with standard transmission refer to Clutch Linkage Section |
|
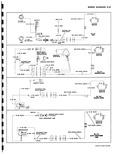 |
WIRING HARNESS 0 o 10 GA BLACK GENERATOR MAIN WIRING HARNESS REGULATOR 10 GA BLACK t FIG 80 C16AREiTE EIGNTEIt 10 GA BLACK N PLUNGER 0 GENERATOR REGULATOR REAR WIRING HARNESS MAIN WIRING HARNESS |
|
 |
LUBRICANT 1 Type Recommended Multipurpose Gear Lubricant SAE 80 1 Capacity |
|
 |
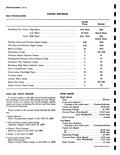
Stroke 3 4375 x 2 61 Compression Ratio 8 0 Turbo Air Advertised Gross Horsepower Rating 80 4400 rpn Braking Lever Ratios Pedal ratio 6 8 Hydraulic 4 52 i Overall 30 74 i PARKING |
|
 |
Reinforcement Roil At Bumper Opening 62 Reinforcement Front Compartment Side 79 Panel Rocker Rail At Stabilizer 80 Filler Toe Pon rrr 63 Reinforcement Front Comportment 81 Panel Front M Side Rail Inner At Suspension |
|
 |
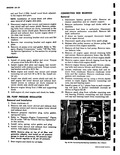
tight or dirt bushings or high resistance connections Volts 10 1 Amperes 58 Min 80 Max Rpm 6750 Min 8600 Max Installation L 1 Place starting motor and solenoid assembly v position and install attaching |
|
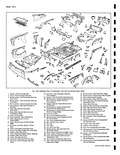 |
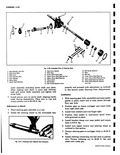
80 61 57 4j Fig 10 3 Exploded View of Underh 1 Support Heat Exchanger Bolt 22 Extension Heat 2 Cover Heat Exchanger Opening Cover Support 3 Rein forcemenT Heat Exchanger Opening 23 Support Heat |
|
 |
Front Compartment Side Opening Rail Outer At Suspension 79 Panel Rocker 66 Reinforcemenf Floor Pan Side Rail 80 Filler Toe Pan At Hold Down 81 Panel Front W 67 Rail Floor Pan Side Rail |
|
 |
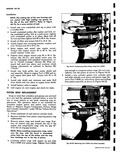
80 Crankcase and Engine Rear Housing Stud Installed Length asy measuring of stud installed length measure rom Tool J 8354 1 2 3 shoulder as shown in i rigure 6A 81 JOTE Cylinder stud torque |
|
 |
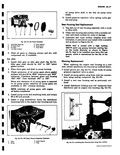
cause the current draw readings to be below the specifications which are based on a temperature of 80 F Installation 1 Place solenoid use special sealing compound around edge in position and gasket in place |
|
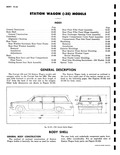 |
seat to the tailgate Other body dimensions are shown in Figure 10 101 70 t 9 7 80 Fig 10 101 1961 BODti GENERAL BODY CONSTRUCTION The method of unitized construction of Station Wagon bodies |
|
 |
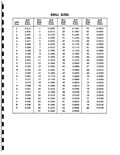
80 13 O 75 90 105 1Ar20 5e i05 120 u 12 60 110 13S 150 9 6 18 65 120 150 16S r I1 8 140 170 200 Yr18 |
|
 |
repair Installation 1 Install oil pump gears gasket and cover Torque oil pump cover bolts 60 to 80 in lbs 2 Install engine skid plate and engine rear mounting bracket with washers and nuts Torque |
|
 |
mounting studs rubber molded stud into place on front mounting bracket Install castellated nuts torque 60 to 80 ft lbs and install cotter pins 1 i J Fig 6A 18 Shift Rod Coupling ISfandard Transmission |
|
 |
replace crankcase studs install long cylinder studs to a projected length of 8 Z fig 6A 80 and short cylinder studs to a projected length of 7 using Tool |
|
 |
dust cap Remove cotter pin from end of spindle 2 Tighten adjusting nut to 80 in lbs while rotating wheel 3 Back off adjusting nut 1 flat 1 6 turn of nut 4 Insert cotter |
|
 |
sector shaft aligning marks made during disassembly Place arm in vise and torque pitman nut to 80 105 ft lbs Adjustment on Bench 1 Place steering gear assembly in a vise 2 Install the steering |
|
 |
Stroke 2 6 Cubic Inch Displacement 145 Compression Ratio 8 0 1 Horsepower Turbo Air 80 4400 RPM Super Turbo Air 98 4600 RPM Torque Turbo Air 128 2300 RPM Super Turbo |
|
 |
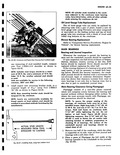
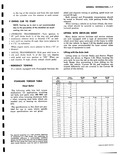
engine from firing If the terminal voltage is less than 9 0 volts at room temperature approx 80 20 F the battery should be further checked 2 If the battery remains undercharged check for loose |
|
 |
80 |
|
 |
Rotation looking at the crank arm Counterclockwise Crank Arm Speed Lo 35 45 rpm Hi 65 80 rpm Operating Voltage 12 VDC Current Draw Free Speed 3 3 5 amp Dry Windshield |