Jeep Parts Wiki | Ford Parts Wiki
Home | Search | Browse | Marketplace | Messages | FAQ | Guest
|
Body Service Manual August 1964 |
|
Prev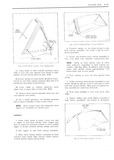
 Next
Next
21 22 FOLDING TOP 18 Usinu nitrile cement or neoprene type weatherstrip adhesive fasten rear quarter flaps to side roof rear rails Make sure that rear w l quarter flap seam is even with forward edge of lf side roof rear rail Install side roof rail rear weatherstrip to help maintain position of quarter 1 1 flaps while adhesive is drying ZZ A 19 Using previously marked lines end of trim 1 1 2 sticks and bolt hole locations in top material as a locating reference tack top material to rear and I W rear quarter trim sticks 1 1 1 1 1 1 1 guplg 20 Install top material into body Make sure 1 rear and rear quarter trim stick attaching bolts Et are completely driven in to represent finished 1 rendition 1 1 A 21 Check fit of top material Rear quarter trim 1 TACK5 sticks may be adjusted downward to remove minor 4 4 wrinkles in top material in rear quarter area v 22 Where required re mark top material then make necessary adjustments to top material by 1672 repositioning rear quarter trim sticks or by re tacking top material to rear or rear quarter trim stinks F5 2 I 52 Eippet I m Il vi n Ae Rem Ouovten Trim SMCL 23 After desired fit of top material has been 10 Install slide fastener onto ZipP 1 TLSSGYHDIY obtained install trim sticks with attached top ma terial into top compartment well and tighten side tl Staple both sections of zipper tape together Hm I 1 Em trim Sfjgk ttg ingl 1 lt5 Staples will aid in preventing zipper scoops from disenaagina and also serve as a stop for the slide 24 Where E quj1 E d yemmvg Side roof rail rear I t t U i Fi 2152 weatherstrips Re adiust top material at side roof rails and reinstall weatherstrips 12 Operate slide fastener to closed position 25 When completed folding top and back cur 13 Tack Zil P l ml to iU Cluarter trim Sti k tain assembly should be free from all wrinkles Fil 2I52 ZiPPt 1 mpg Should mt bc Puuod taut and draws Install all previously removed trim and JS ZIPPGY twth mu 1 thrgugh wl nlitariiil hardware and clean any soilage from top material after top has been properly installed my back Curtain agsemiqly 1 I Install trim sticks with attached back curtain assembly into body NOTE Make sure that all trim stick bolts are driven completely in to represent finished z nditi n 15 Check contour of back curtain assembly at pincliweld moldina Where required place refer ence chalk mark on outer surface of back nurtain alone pinchweld finishine molding Re adjust back t urt iin assembly by retacking curtain to rear or rear quarter trim sticks as required 16 Detaeh rear trim stick with attached back curtain assembly from body 17 Carefully replace top in position in rear quarter area