Jeep Parts Wiki | Ford Parts Wiki
Home | Search | Browse | Marketplace | Messages | FAQ | Guest
|
Body Service Manual August 1964 |
|
Prev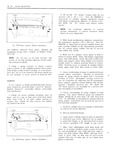

 Next
Next
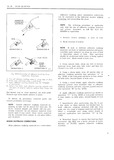
NEAR QUAR l l H 2li 35 8 Remove glass YOU body opening and place inner surface up on a glass holding fixture or clean protected surface NOTCH GLASS BEAD CUT VSMEAR BEAD NOZZLE ALONG SCORE NOZZLE ON 45 LINE DEGREE ANGLE 9 Beginning at a corner apply one inch masking N tape completely around edge of glass 1llIl surface t U ls inboard from outer edge see Fig 2E41 0 5 ifx E V it 10 From inside of body apply masking tape A B around window opening to protect painted and trim med surfaces cl fyi 1 fi NOTE Adhesive caulking compound is very dif ki Q xix flcult if not impossible to clean off of trim we yi materials 2 l tf iR t l J 11 Using a clean lint tree cloth liberally damp GLASS EDGE ened with adhesive caulklng primer briskly rub y l primer over and into original adhesive eaulking E ADHESIVE material remaining on pinchweld flange completely J CAULK NG around window opening Perform following steps 3 E MATEMM while allowing primer to dry 5 to 10 minutes If the r 3 i1 pinchweld flange has been repainted prime flange with Painted Surface Primer or equivalent my 12 Enlarge dispensing end of one nozzle by cut ting out notch along score line indicated at A iu Via 2E4l t clt es e Caiiikinu A le i l pplicoti n Figure 21241 This nozzle will be used to apply the E ld d M H l bead of adhesive material to glass Cut nozzle from fifteen I5 minutes exposure to air tllerelore the second kit at a 45 degree angle as lndicated at peyftlym the fotlgwmyg gtgpg mungttpqtgty and B in Figure 2E4l This latter nozzle will be install glass in the opening as quickly as used to apply a smear bead to pinchweld flange of ptlggllyte opening 17 Remove glass bead nozzle and insert 13 Wipe surface of glass to which bead of l bgidn NOZZIG lnezzle Cut on 457 J adhesive caulking material will be applied between HOllll M 03 U i will at 311 angle S0 that opening of masking gpg and edge Of glass with 3 c ggu nozzle rests flat on pinchweld flange apply a thin water dampened rag Dry glass thoroughly with a 1 4 vide X 1 1G high SUTEHF bE d l lll Ctg m dpyydgy j n F caulking material completely around pinchweld 7 flange 14 Remove cap and protective end cover from one tube of adhesive eaulklng material and insert 18 With the aid ol a helper carefully install bead nozzle nozzle cut on sem e line glass as describetl l 1 Vi l 5lY in Step 4 Wies ZE39 and 2E4 1 Make certain that glass sets 15 Insert tube in a standard household type properly on all spacers and does not have tobe caulking gun reworked as follows shifted after caulking material contacts pinchweld flange Focus attention on tape guides that were a Widen end slot of caulking gun with l file applied to glass and body to properly align glass sufficiently to accept dispensing end of tube ill 0D i I4 b Grind down disc on plunger rod so that disc NOTE When setting glass into opening make will fit into large end of tube contact with upper edge ol glass first then swing in lower edge Install reveal moldings to hold 16 With caulking gun and nozzle positioned as glass in opening illustrated in Figure 2E41 carefully apply a smooth continuous bead of caulking material 8 high by 19 Working inside the body run zi flat stick 3 16 wide at base completely around inside edge around window opening pinchwcld flange to press of glass squeeze out material back into opening between glass and piuchweld flange NOTE When material in first tube is dispensed quickly insert second tllbe and continue applica 20 Watertest car immediately with a cold water tion of bead This material begins to cure after spray lf any waterlenks are encountered use l