Jeep Parts Wiki | Ford Parts Wiki
Home | Search | Browse | Marketplace | Messages | FAQ | Guest
|
Body Service Manual August 1964 |
|
Prev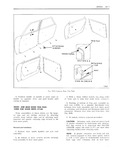

 Next
Next
2D 4 DOORS Orrr V i K rrr V Z2 r r V r J EA V V 1ii J VVV V LV VVVV E y ViiZVVV jp e V 7 g if V P VV i I M i 7 VV oi it e It W 7 7 ll G r V rrrr K 1 VVVVVV J V i s I D 4 i I J A V l V E I F INNER PANEL 7 H I i Il A We mum PAD sv VV TRIM PAD RETAINER M RETAINER so e V V t SECTION A A V if ij V M fi i V SEALING PLUG OOOO ts I Y if xi L K AnAcHIr 1c CLIP J I i W i A ns W i B X pj I if Fe e I li t L 4 VIEWINCIRCLEB 1358 Fig 2D5 Dc 0r Trim Assemblies panel Make two slits in tape to form an X 2 Remove attaching screws along bottom of pattern Cheek retainer for snug fit If retainer door trim pad is still loose repeat above operation by install ing a second pieee of tape over existing repair 3 Carefully insert tool J 6335 or a suitable This proc edure may also be used to repair flat bladed tool between door trim assembly and waterleaks which develop around perimeter of door inner panel at retaining clip locations and retainer disengage clips from retaining plugs See Fig ZD5 FRONT AND REAR DOOR TRIM PADS ALL STYLES NOTE Broken or damaged retaining clips EXCEPT 33800 AND 44400 SERIES STYLES V should be replaced Both the front and rear door trim assemblies art secured to the door inner panel by trim pad 4 Pull top edge of trim pad down slightly to retainers at top retaining clips along both sides disengage it from the trim pad retainer and re and screws at the bottom Trim pad retainers are move trim pad from door atta hed to the door inner panel by screws The retaining clips along sides are pressed into 5 To i St U 1 V 1 S 1 111 JVH1 D1 0 d 1 plastie retainers or cups which fit into slots in the EX 1 Ci CBN HUY YU di tU b i Y IHHQI i t il door inner panel d f19CtUY V NOTE lf plastic retaining plugs are loose and Rem v I und Ins II I n g will not remain engaged in door inner panel m i Remove door inside handles and arm rest stall a l 2 x 3 4 piece of clotli baCkedwater assembly proof body tape over retaining plug hole and door