Jeep Parts Wiki | Ford Parts Wiki
Home | Search | Browse | Marketplace | Messages | FAQ | Guest
|
Corvair Chassis Shop Manual December 1964 |
|
Prev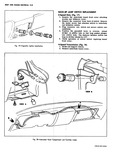

 Next
Next
W r i Fig 21 Rear End Lighting 3 Untape switch wire from body wiring harness and separate switch wiring connectors 4 Disconnect switch wiring from body attaching clips and remove switch assembly from transmission 5 Install new switch assembly and gasket i n transmission 6 Route switch wire assembly through body attaching clips and connect to forward wiring connector 7 Tape switch wire to body wire harness 8 Install underbody tunnel cover 9 Lower vehicle and check operation of switch CIGARETTE LIGHTER REPLACEMENT Fig 19 Replacement i Disconnect terminal at rear of unit under panel 2 Remove retainer from rear of housing under the instrument panel 3 Remove knob housing and bezel from panel opening 4 To install position housing and bezel to panel opening then attach retainer to rear of housing 5 Connect wire lead to rear of housing and insert knob assembly into housing Check operation of unit INSTRUMENT PANEL COMPARTMENT LAMP Bulb or Switch Replacement Fig 20 1 Reach into panel compartment depress bulb in end of switch and turn it counter clockwise Remove bulb 2 Push switch out of mounting hole Carefully pull wire and terminal out of switch If terminal is not removable cut switch wire 3 Insert wire and terminal into new switch Splice wire if cut during removal 4 Push switch into place and install bulb by setting it in place depressing and turning it clockwise COURTESY LAMP REPLACEMENT Fig 20 1 Unsnap lamp socket from mounting bracket 2 Remove bulb from socket and insert new bulb 3 Snap lamp socket into mounting bracket TAIL STOP DIRECTIONAL AND BACKING LAMPS Fig 21 To Replace Bulb i Unsnap bulb socket from underside of lamp housing in engine compartment 2 Remove bulb and install new bulb into socket 3 Snap socket into lamp housing and check operation of lamp Close engine compartment To Replace Housing 1 Unsnap socket from housing inside engine compartment 2 Remove retaining nuts from housing bolts and detach lamp housing assembly from body 3 Position new lamp housing assembly to body and install retaining nuts 4 Snap bulb in place and check operation of lamp To Replace Lens 1 Remove lens retaining screws and carefully detach lens from lamp housing 2 Position new lens to housing and install retaining screws LICENSE PLATE LAMP REPLACEMENT Fig 22 1 Remove lens retaining screws and lens 2 Disengage bulb from socket 3 Replace bulb position lens and install retaining screws w i 1 A VIEW p Fig 22 License Plate Lamp