Jeep Parts Wiki | Ford Parts Wiki
Home | Search | Browse
|
Corvair Chassis Shop Manual December 1964 |
|
Prev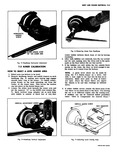
 Next
Next
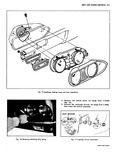
AhOEItSOFk UNNANA MADE IN U S A i W w Y m v NOTE When level portion of floor is obtained mark tire spots on floor so spots can be used next time without calibrating Aimer TO COMPENSATE FOR UNLEVEL FLOORS If your floor is not level within the limits specified the T 3 Aimer can be calibrated to compensate for the error in the floor Follow this procedure with both aimers 1 Drive the car onto the area for which you wish to comfensate the aimers and install the aimers in placO on the headlamps Z Loo en knob beneath the aimer arm and move the slid r until the bubble is centered 3 Recdrd the numeral in the view window This numeral is to be used only for recalibration 4 Move the slider to a position halfway between this recoirded numeral and the numeral 1 2 in the DOWN window This numeral is used only in recalibration and not for headlamp aiming 5 Reftlibrate aimers by turning screw shown in Figure 8 until the bubble is centered 6 The T 3 Aimers are now calibrated for the selected area All future aiming must be done in the same area and with the car pointed in the same direction Mark the tire spots on the floor so that future cars can be located in the same position ERATIONS PARKING LAMP SERVICE Fig 9 Lense or Bulb Replacement 1 Remove two lense attaching screws and lense from housing 2 Remove bulb and install replacement lamp 3 Position lense to housing and install retaining screws Housingj 1 Working inside the luggage compartment remove cov plate in floor pan 2 Remove attaching nut and 1 U clamp at rear of housing 3 Disconnect wiring at rear of lamp socket 4 Posttion housing to body and install clamp and retaining nut 5 Con ect wiring to lamp socket and install lamp 6 Chedk operation and install cover plate LIGHTING SWITCH REPLACEMENT Fig 11 1 Discpnnect ground cable from battery 2 Pull nob out to headlamp ON position 3 ReaO under the instrument console and depress the switch shaft retainer fig 11 With retainer depressed pull knob and shaft assembly from the switch