Jeep Parts Wiki | Ford Parts Wiki
Home | Search | Browse
|
Corvair Chassis Shop Manual December 1964 |
|
Prev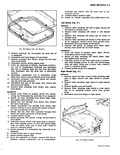

 Next
Next
6 Remove bolt attaching muffler bracket to right shield 7 Remove muffler 8 Remove right shield by pulling from under upper shroud and front shield Installation 1 Place right shield in position under upper shroud and front shield 2 Install all bolts attaching right shield finger tig t then tighten bolts securely 3 Lubricate groove of seal with liquid soap or silicone then while guiding groove of seal onto shield flange with one hand press seal in place with a block of wood or a hammer handle 4 Connect ground strap if so equipped 5 Install ignition coil and bracket then install spare tire Rear Center Shield Fig 21 I NOTE The rear center shield is two pieces The engine seal is connected to the upper half I which need not be removed under normal conditions Removal and Installation Lower Half 1 Remove bolts attaching rear center shield to skid plate and exhaust ducts 2 Remove rear center shield 3 Place rear center shield in position with attaching bolts fingertight then tighten bolts securely Removal and Installation Upper Half 1 Remove lower half as outlined 2 Disconnect seal from flange of rear center shield 3 Remove bolts and remove upper half 4 Install upper half and tighten securely 5 Install lower half as outlined 6 Lubricate groove of seal with liquid soap or silicone then while guiding groove of seal onto shield flange with one hand press seal in place with a block of wood or a hammer handle Muffler Heat Shield Fig 22 Removal 1 Remove two bolts attaching heat shield to muf ler hanger OI Fig 22 Muffler Heat Shield w o s o w W I III m Fig 23 Upper Shroud 2 Loosen two bolts attaching rear of heat shield and right rear shroud to cylinder head 3 Remove heat shield Installation 1 Install heat shield in position under head of two bolts in rear of cylinder head 2 htstall bolts attaching heat shield to muffler hanger and tighten securely 3 Tighten two bolts attaching rear of heat shield and right rear shroud to cylinder head ENGINE COOLING COMPONENTS Upper Shroud Fig 23 Removal 1 Remove spare tire then remove air cleaner assembly 2 Disconnect fuel lines at fuel pump and carburetors then remove fuel lines to carburetors 3 Disconnect vacuum advance hose at right carburetor 4 Disconnect accelerator rod at carburetor cross shaft and disconnect choke control rods at choke levers then remove upper choke control rods 5 Remove carburetors with cross shaft and linkage attached 6 Remove blower belt 7 Disconnect crankcase ventilation tube at upper shroud then disconnect vacuum balance tube at bracket and cylinder heads 8 Remove vacuum balance tube and crankcase ventilation tube and hoses as an assembly 9 Remove Delcotron with bracket attached 10 Disconnect heater hose at upper shroud 11 Remove oil cooler access hole cover and oil dip stick 12 Remove distributor cap then remove spark plug wires and distributor cap as an assembly 13 Remove bolts attaching upper shroud then remove shroud by raising front of shroud and rotating clockwise to clear oil filter and Delcotron adapter CCNtVAIR SHOP MANUAL