Jeep Parts Wiki | Ford Parts Wiki
Home | Search | Browse | Marketplace | Messages | FAQ | Guest
|
Corvair Chassis Shop Manual December 1964 |
|
Prev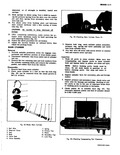
 Next
Next
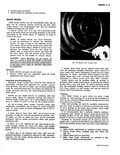
Fig 25 Checking Wheel Cylinder Piston Fit Assembly Whenever a hydraulic brake main cylinder is over I hauled care must be taken to reassemble the check valve I correctly Improper assembly of the check valve seat will result in its distortion When the check valve seat is distorted there will be no check valve action and there will be a loss of brake pedal travel also the pedal will have to be depressed or pumped one or more times i before actual car braking occurs 1 Install valve seat in cylinder bore so that flat portion of seat rests against end of cylinder bore 2 Position valve and spring assembly into bore 3 Dip primary cup into clean brake fluid and install into main cylinder with the flat side toward push rod end Make sure cup seats over end of spring 4 Assemble the secondary seal in the groove on thel piston so that the lip faces toward the end of the piston that contains the bypass holes 5 Dip piston in clean brake fluid and place piston in cylinder bore 6 Install piston stop ring 7 Check clearance between the edge of the primary cup and the center of compensating port NOTE This check is made easily by using a wire and inserting it through the reservoir and into piston chamber fig 24 8 Install a new seal in cover and place cover on cylinder Secure by snapping bail wire in place 9 Install rubber boot making certain boot seals tightly on cylinder body This seal must be maintained td keep water and other foreign matter from entering the main cylinder 10 Install mounting gasket to main cylinder Installation 1 Position main cylinder on mounting studs and secur to dash wall Make sure push rod goes through rubber boot and into piston 2 Connect brake line to main cylinder 3 Check and if necessary adjust brake pedal fre I play 4 Bleed brakes as outlined in this section WHEEL CYLINDER Removal 1 Raise vehicle and place on jack stand I 2 Remove wheel and tire assembly back off brake adjustment only if necessary and remove drum 3 Disconnect brake system hydraulic line from cylinder 4 Remdve brake shoe pull back springs 5 Remove two cap screws that hold wheel cylinder to flange plate disengage wheel cylinder push rods from brake shoes and remove wheel cylinder Disassembly 1 Remove the cylinder boots 2 Remove the pistons rubber cups and spring 3 Wash all parts in clean alcohol NOTE Before washing parts hands must be clean Do not wash hands in gasoline or fuel oil before cleaning parts Use soap and water to clean hands Inspectiom 1 Inspect cylinder bore for smoothness A scored or damaged cylinder must be replaced 2 Chedk rubber cups for damage or swelling Replace the cups when necessary Improper brake fluid will cause the cups to swell as much as 40 per cent 3 CheCk fit of the piston in the cylinder bore using a feeler gauge fig 25 This clearance should be from 002 004 If clearance exceeds 004 replace cylinder Assembly Fig 26 1 Moi3ten cylinder bore pistons and rubber cups with brake fluid before assembly 2 Place a boot over one end of cylinder 3 Insert a piston with flat side toward open end of cylinder 4 Insert a rubber cup with flat side against piston 5 Insert spring with expanders securely connected and follow with remaining parts in the reverse order of foregoing assembly procedure Installation 1 Position wheel cylinder to brake flange plate install cap screws and tighten securely 2 Replace all push rods and pull back springs 3 Connect hose or line to wheel cylinder NOTE If replacing front wheel cylinder connect hose and inspect installation as outlined in Hydraulic Brake Hose Replacement 5 JPb t 1 2 3 4 7 4 3 2 Awk we 0 1 a C 0 J Fig 26 Wheel Cylinder 1 Push Rod Boot 5 Housing 2 Pistom6 Bleeder Valve 3 Piston Cup 7 Spring 4 Piston Cup Expander CORVAIR SHOP MANUAL