Jeep Parts Wiki | Ford Parts Wiki
Home | Search | Browse
Prev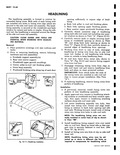
 Next
Next
I may be too tight against the roof panel or too loose making it difficult to remove draws or wrinkles 6 Stretch and stay tack headlining along entire windshield and back body openings Apply trim cement to side edges of headlining assembly 8 Working toward front of body install headlining to side roof inner rail cutting headlining to shape at center pillar and upper rear body lock pillar Remove all draws or wrinkles as required from headlining assembly 9 Trim excess material from edges of headlining assembly 10 Using a headlining inserting tool install trimmed edges of headlining to outer surface of side roof inner rail to give headlining a finished appearance EXTERIOR REAR QUARTER WINDOW FRONT REVEAL MOULDING The moulding of painted finish is secured by snap retention to special previously installed clips on the quarter window pinchweld The moulding is overlapped by the upper reveal moulding To remove the moulding loosen the front half of the upper reveal moulding Using a suitable flat bladed hook tool unsnap the outer edge of the moulding from the retaining clips located at the top center and bottom of the moulding To install the moulding replace moulding retaining clips as required Position the moulding to the body engage the inner edge of the moulding over the retaining clips and with a pair of pliers properly insulated snap the moulding into place Install the upper reveal moulding Seal and complete the installation of the rear quarter window REAR QUARTER WINDOW UPPER REVEAL MOULDING The moulding of painted finish is secured by snap retention to special previously installed clips on the quarter window pinchweld To remove the moulding loosen the rear quarter window across the top of the opening Protect the front reveal moulding from damage as required Using 1 a suitable flat bladed hook tool unsnap the outer edge of the moulding from each retaining clip To install the moulding replace retaining clips as required Align the moulding with the front reveal moulding and engage the inner edge of the moulding with the retaining clips Protect the front reveal moulding from damage as required With a pair of pliers properly insulated snap the moulding outer edge into r 11 Inspect headlining along back body opening Remove draws or wrinkles as required by stretching material and retacking After all fullness has been removed permanently tack headlining assembly across back body opening 12 Trim away excess material across back body opening 13 Inspect headlining along windshield opening Remove draws and wrinkles as required by stretching material and retacking After all fullness has been removed permanently tack headlining assembly across windshield opening 14 Trim away excess material across windshield opening 15 Install door opening and rear quarter upper pinchweld finishing strips and all other previously removed inside hardware MOULDINGS position at each clip location Seal and complete the installation of the rear quarter window REAR FENDER LOWER MOULDING The moulding is secured to the rear fender by a bolt and clip assembly at the rear and by bathtub type snap on clips On 35 styles the bolt and clip assembly is the rearmost attachment On 27 and 69 styles the bolt and clip assembly is located at the moulding rear radius To remove the moulding remove the rear clip bolt nut With a flat bladed tool carefully unsnap the moulding from each retaining clip To install the molding replace damaged clips and seal the replacement clips as required Apply body caulking compound to the clip bolt and attaching nut Position the moulding to the fender and over the retaining clips and snap it into place Install the attaching nut ROOF DRIP MOULDING ESCUTCHEON 535 Models Only The escutcheon is painted body color and is secured to the roof drip moulding and to the roof drip moulding rear extension by snap retention The escutcheon is located at the upper rear corner of the body over the rear quarter window To remove the escutcheon use a pointed hook tool unsnap the lower rolled edge of the escutcheon under the drip moulding and life the escutcheon straight up If necessary detach the escutcheon straight up If necessary detach the escutcheon upper formed flange To install the escutcheon position the escutcheon to the drip moulding and snap the lower rolled edge under the drip mouldings Form the escutcheon upper flange to nest in the drip moulding Touch up as required