Jeep Parts Wiki | Ford Parts Wiki
Home | Search | Browse | Marketplace | Messages | FAQ | Guest
|
Body Service Manual August 1964 |
|
Prev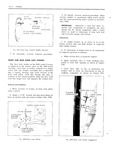

 Next
Next
4469196
4469196
4469197
4469197
4469194
4469194
4469195
4469195
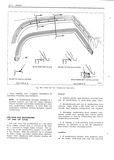
DOORS 51 5 CAUTION Do not close door completely Com i l 41 closing will make clay removal very W JN i i tw eeeee d Measure the impression in the clay as follows RETA N E R i4 e Striker head should be centered fore and aft as shown Although 3 16 is shown as desired t lt 3 j X measurement on both sides of St1 lki l hE 3d V EATHER TR F Q f a tolerance of plus or minus 1 32 is allowed ll l ily my The following spacers are available as service tl lh parts and can be used individually or in 00111 tf bination to achieve the desired alignment iw 5V64 spacer Part 4469196 5 spacer Part 4469197 1 4 spacer Part 4469194 RETAINER 5 16 spacer Part 4469195 ii V FRONT AND REAR DOOR WEATHERSTRIPS Y V t Both front and rear door wcatherstrips are retained down the sides of the door and across the door bottom by a series of nylon fasteners that V7 3 16 are inserted into piercings in the door inner panel The upper ends of the weatherstrips with the 1 4 exception of the front and rear door hinge pillar rl ends are additionally retained by rosebud snap fasteners To remove a weatherstrip retained with l L the nylon fastener requires the use of a tool ti J ZHOA similar to tool 21104 shown in Figure 5D10 lf wu this tool is not available a comparable tool can be fabricated according to the dimensions shown Fig 5DlO Door We rherstrip Remov I A door weatherstrip assembly purchased as a service part will consist of the weatherstrip and CAUTION Use care not to damage serrations nylon fasteners The nylon fastener however is on fasteners as they are required to weatherseal also available as a separate service part panel piercings Removal m 1 Il i 1 Remove snap fasteners securing weatherstrip 1 Check weatherstrip nylon fasteners for at belt line damage and replace if necessary Check weather strip for tears and cuts and replace if badly 2 On rear doors only carefully break cement damaged The foam construction of weatherstrip bond between weatherstrip and door lock pillar will absorb moisture and corrode adjacent metal starting at belt line and working down for 1 distance parts if the surface skin is broken and not resealed of approximately seven inches 2 On rear doors only clean off old adhesive NOTE This is the only location for whiCh from door lock pillar and apply a bead of weather weatherstrip adhesive is specified on either the strip adhesive to lock pillar starting at belt line front or rear door however adhesive can be and extending clown for a distance of approximately used at any location where additional retention Seven int hes is required 3 On front doors position lock pillar end of 3 IJISGH m h91 StI il Y l 0V H1 WUI J 21104 b9 weatherstrip to door and install snap fasteners at tween weatherstrip and door at fastener locations belt line On rear doors begin installation on and engage slot in tool with fastener stud then hinge pillar carefully pry fastener out of door piercing Fig 5D10 PEMOYW this UPBFRUOU iii h f SY 1 4 Working down and around door drive nylon location and remove weatherstrip fasteners into door piercings using a hammer and