Jeep Parts Wiki | Ford Parts Wiki
Home | Search | Browse | Marketplace | Messages | FAQ | Guest
|
Body Service Manual August 1964 |
|
Prev
 Next
Next
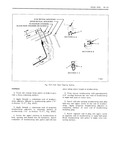
4F 18 REAR END TAIL GATE HINGE ASSEMBLIES NOTE Objectionable slack in either tail gate support can be eliminated by rotating one or both Rem v I und lnst II Ii n support plates at the body pillar l Open tail gate and provide support for gate on 1 Positioning dimple towards bottom shortens side from which hinge is to be removed support approximately 3 8 from production installation 2 Remove escutcheon covering hinge entrance hole in tail gate outer panel 2 Positioning dimple towards top shortens support approximately 3 4 from production 3 Remove tail gate hinge attaching screws from installation tail gate Fig 4Fl2 and from body pillar Fig 4F26 and remove hinge from tail gate TAIL GATE WINDOW UPPER GLASS RUN CHANNEL 4 To install reverse removal procedure Prior AND RETAINER to installation apply a coat of heavy bodied sealer Removal to surface of hinge strap that contacts tail gate l Lower tail gate window and open tail gate Check ahgllltwnt et tml gate 1 9 s i e mt Remove rear body opening upper garnish molding adjust gate it necessary as specified in l ail Gate Ad St E 2 Remove exposed clip at each end of glass run channel securing run channel to body pillar at belt line TAIL GATE TOROUE ROD 3 Carefully break cement bond between glass Rem v I ndlns II i n run channel and glass run channel retainer and remove glass run channel l Open tail gate With gate in approximately a vertical position to relieve tension from torque rod 4 Remove screws securing glass run channel remove torque rod retainer attaching screws on retainer to body and remove retainer rear body cross bar Inslullution 2 Lower gate to fully open position and remove tail gate inner cover panel Loosen screws secur 1 Clean off old cement and sealer from body ing torque rod bearing plate at location where glass run channel and glass run channel retainer torque rod enters tail gate 2 Apply a bead of medium bodied sealer up 3 Detach lower left corner of inner panel water sides and across top of back body upper opening deflector sufficiently to remove torque rod re surfaces contacted by glass run channel retainer taincr attaching screws on tail gate inner panel l in Section A A Fig 4F27 lnstall glass Fig 4Fl5 then remove torque rod from tail run channel retainer and attaching screws gate through entrance hole 3 Apply a bead of weatherstrip adhesive black 4 To install reverse removal procedure to reverse side of glass run channel 2 in Sec tion A A 4F27 and insert glass run chan nel into retainer TAIL GATE SUPPORTS 4 Clean off all excess sealer and install previ Removal me n s u a n S1Y d l tS 1 Open tail gate and provide support for side TAIL GATE OPENING WEATHERSTRIP from which tail gate support is to be removed Removal 2 Remove tail gate support plate attaching screws from both tail gate and rear body pillar 1 Open tail gate Remove four 4 weatherstrip Fig 4F26 and Fig 4Fl2 and remove tail gate upper corner fasteners at belt line supports 2 Starting at either upper corner carefully 3 To install reverse removal procedure Install break cement bond between weatherstrip and body support plate to body pillar with positioning dimple using a flat bladed tool Remove weatherstrip from towards front of body body